Pages

Tuesday, January 22

Shampoo Sulfates & Surfactants


Researching what it means to have naturally curly hair led me to hear a lot about sulfates being a big NO in the community. I looked at my textbook from cosmetology school to find out more about what makes sulfates so scary.
  • What Are Sulfates & Surfactants?
Water has tension which holds it together. When it rains each drop stays together before hitting the ground because of the surface tension helping it stick. Once it hits the ground the surface tension is broken and it spreads onto the ground. When you are in the shower the water falls onto your hair and is held together by this tension.

Sulfates and surfactants are added to shampoo in order to break the waters surface tension so it will become MORE of a liquid and spread easier onto your hair. The shampoo then penetrates through the product buildup and dirt on your scalp easier achieving a deeper clean. Detergents and are what makes your shampoo lather but the lather doesn't really help your hair any. When you get this lather into your eyes it stings from this chemical. Baby shampoo is usually labeled "no tear" or "tear free" formulated. They can say this because baby shampoo does not contain sulfates so nothing in the shampoo burns when it comes in contact with the eyes. It still doesn't mean shampoo is good to get in a baby's eyes!
  • But Why?
Sulfates such as Sodium Lauryl Sulfate are very commonly used in 90% of commercial shampoo's and in high concentrations are used to de-grease car engines! It strips your body and hair of it's natural oils causing your hair and skin to dry out faster than it normally would. They use the chemical to get the best results possible from the product and the whole point of shampoo is to cleanse your hair.
  • Do I Need Sulfates?
NO... Technically you do not need your shampoo to lather but YES, you will want the water in your shower to penetrate and clean your hair the best it can. This is also a challenge that comes along with well water or hard water. Media has made us all believe that when a shampoo lathers it means it's working but it would with or without this added chemical. The chemical is just used to enhance the results of the product it's in. 

Sulfates are both a good and a bad thing. The pro is that your hair will be very clean but the con is that your hair will become dry over time. The trade off of never using sulfates is that your hair will need washed more often and your hair will never be as squeaky clean as it could be. But to some people this isn't the end of the world.
  • Will Sulfates Harm Me?
Sometimes... They can worsen pre-existing medical problems or burn your eyes when they come in contact with the lather of sulfates. With repetitive exposure to sulfates coming  in contact with the eyes it can cause severe damage and blindness in infants from breaking down our cells proteins. Some studies have found the chemical can lead to cancer or hair loss as well! Chemicals included in shampoo containing sulfates have been found to effect the liver and lungs as well.
  • Who Shouldn't Use Sulfates?
  1. Age- The older you get the more sensitive your thinning skin can become.  The Sulfates can dry aged skin out and take away needed oils.
  2. Eczema- Sulfates are proven to cause extreme irritation to people with eczema.
  3. Dandruff- Sulfates will worsen this and cause more flaking from drying out the scalp even more.
  4. Oily Skin- Even though sulfates remove oil from the skin the issue is when your constantly removing them your body over produces oil to replace what's been lost. It's a vicious circle of having an oily scalp --> using sulfates to get rid of oil --> your body produces more oil to replace what was stripped away so you start the cycle over again increasingly making it worsen.
  5. Dry Hair- Not only ethnic people get dry brittle hair. Sulfates will just worsen the dryness causing more harm than good. It could even lead to dandruff over time.
  6. Ethnic Hair- African American hair especially can be brittle and dry by nature. Chemicals like relaxers create overly porous hair as well. The sulfates just worsen the dryness and can cause the brittle hair to be breakage prone.
  7. Chemically Treated or Color Treated Hair- Sulfates will strip the color out of your hair slowly over time with each wash or dry out and break off chemically lightened damaged hair.
  • Irritating Sulfates:
  1. Sodium Myreth Sulfate
  2. Tea Laureth Sulfate
  3. Sodium Laureth Sulfate
  4. Sodium Lauryl Sulfate... The best cleaner, the cheapest, and the most popularly used.
  5. Ammonia Laureth Sulfate... The most irritating sulfate!
  • What Else Contains Sulfates?
  1. Toothpaste... except for Sensodyne
  2. Conditioner
  3. Shaving Cream
  4. Body Soap
  5. Bubble Bath
  6. Liquid Soap
  7. Body Gel
  8. Laundry Detergent

Beware Of  Head & Shoulders:

While going to hair school I was warned about all the bad stuff inside of head and shoulders. I decided to try it out for myself and I hated it. I think It made my scalp even dryer and more sensitive. My hair felt like straw after as I struggled to get my fingers through the tangles. Here's a breakdown of some of the ingredients listed on the back. I found that it was filled with multiple sulfates, silicone's, and alcohol!
  • Sodium Laureth Sulfate- It's the 3rd most irritating sulfate and is the second ingredient. It can cause skin and eye irritation.
  • Sodium lauryl sulfate- 3rd ingredient and the second most irritating sulfate. Has been used in medication as a laxative in enemas. It can irritate the face, eyes, and skin and worsen pre-existing skin issues. When used in toothpaste it can cause the recurrence of canker sores.
  • Dimethicone- 4th ingredient and is a commonly used oil based silicone. This silicone is also used in contact lenses, medical devices (breast implants), caulking, lubricating oils, Rain-X, and heat-resistant tiles. This chemical coats your hair creating a barrier that moisture and hair products cant get past.
  • Cocamide MEA- Also a surfactant or detergent and foaming agent made of fatty acids
  • Zinc Carbonate- A feed additive or medication added that can have harmful effects when inhaled. It can cause coughing or wheezing. It can also irritate the eyes and skin as well as cause liver issues in high exposure incidents.
  • Sodium Xylenesulfonate (Sodium Xylene Sulfonate)- A sulfate that is used as a thickening agent. It can also irritate the eyes, skin, lungs, and liver. It's the 8th ingredient.
  • Cetyl Alcohol- A softening oily alcohol that is used in shampoo as a lubricant and thickening agent. This ingredient gives the product moisture helping your hair to feel soft and smooth. But it still works as an oily type of sulfate breaking waters surface tension. It's used to lubricate industrial machine parts like nuts and bolts also. If overused it can make the hair feel oily.
  • Magnesium Sulfate- A drying agent also known as Epsom Salt. This can also be used as a laxative.
  • Sodium Chloride- Also known as table salt.
  • Sodium Benzoate- A salt used to preserve the ingredients in the shampoo.
  • Benzyl Alcohol- An aromatic preserving alcohol. It's commonly used in head lice shampoo. It irritates the eyes, skin, and lungs. 
  • Are Their Any Sulfate Free Shampoo's?

You can get sulfate free shampoo and conditioners at Sally Beauty Supply stores, Wal-mart, CVS, Wal-greens, Target, and Publix. 

~There will be a ton of links below for all of the products. 
Just Click the product name and it will take you to the website.~
Popular Brands:
Natural Hair:
& SO MANY MORE... With all of these options why would you ever need to use sulfates in your hair?

Tips:
...
  • Even though many products say that they are sulfate free on the packaging doesn't mean that its true. Always check the ingredient label on the back of the bottle before purchasing it to make sure. Some products turn out to be low in sulfates instead.
  • Try to shop at a more popular stores and ask about their return policy. That way you aren't wasting money on products you use once and hate. 
  • Check YouTube for reviews on specific items to see what others have to say before going shopping. 
  • Be on the look out for sales and coupons floating around. Some websites like Miss Jessie's may even send you free samples to try!
Curly Pudding, Pillow Soft Curls, Super Sweetback Treatment, Curly Meringue, and Creme De La Creme Conditioner

~"I've had enough, this is my prayer, that I'll die living just as free as my hair."~

Thursday, January 17

Get To Know Your Hair

Everyone dislikes aspects of their hair and everyone struggles at one point or another to get their hair to do what they want. Hair products may not be working for you or maybe you can't figure out why your hair is so dry. Get to know your hair and find out the answer...

The Hair Structure
...
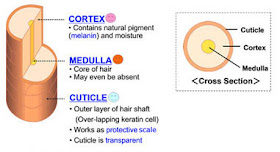
  • Cuticle- The tough outermost layer off the hair that is visible to the eye. Think of it like a protective wall around your hair stand. You have to penetrate this layer to get effective results from chemicals and hair products. 20% of hairs strength.
  • Cortex- The middle layer that gives your hair elasticity and holds 80% of the hairs strength.
    • This contains the mixed melanin that determines your natural hair color.
  • Medulla (pith/core)- The innermost layer of the hair. Some people can be missing this part of the hair strand.
http://1.bp.blogspot.com/_xCfdo_360cw/TS82_bLt6nI/AAAAAAAAApQ/Yf-3PmN-fPo/s400/allabouthair_img_structure.jpg
An open cuticle is an unprotected hair strand that's missing its armor. This can be bad or good depending on your personal needs. If you find that hair products are just sitting on your hair then you may need to open the cuticle to let them penetrate to the cortex. If you have color that seems to fade fast or dry brittle hair your cuticle may never be closing.
How do you open the cuticle?
  1. Heat- Heat tools
  2. Warm Water
  3. Alkaline Chemicals
http://www.hairdressersus.com/micro/Image5b.jpg
Extremely Raised Cuticle 
Slightly Raised Cuticle
How do you close the cuticle?

After you've opened the cuticle you need to seal it back down again to lock in whatever product you've placed in your hair. Whether that be color or a hair product. A sealed cuticle is a shiny smooth cuticle!
  1. Cool water rinse after conditioning
  2. Apple cider vinegar treatment
  3. Smooth products into the hair in a downward motion from root to end
  4. Acidic hair products
  5. Cold Air (winter months)
https://blogger.googleusercontent.com/img/b/R29vZ2xl/AVvXsEhrTOkyyFlo3QnrLD5FTYvcOJZ8ve9-yLZys0fYsnCZJRZIff4aFZIlYKBPVmptPINbRSV00lmxX7qw_jg7sFdTbXuPRoy3vzBpDqt1PA_js2FNq9PItoRwvnjhTkRugV_LO5hr-XkdfgXr/s1600/m-thair.jpg
Smooth Cuticle
Hair Texture
...
The thickness or diameter of a single strand of hair. Different parts of the hair can have a different texture.
  • Large Diameter- Coarse Hair
  • Medium Diameter- Medium Hair
  • Small Diameter- Fine Hair

Your hair color is distributed through the hairs cortex differently according to the hairs texture
  • Fine Hair- Melanin granules are grouped tightly together so it takes to hair color faster resulting in a deeper our darker pigment.
  • Medium Textured Hair- Has an average reaction to color. The most common texture.
  • Coarse Hair- Has loosely grouped melanin granules, so it may take longer to process color. Stronger than fine hair.
Density
...
The number of hairs per square inch. The more hairs per square inch the thicker the hair is.You can have thin hair but a lot of it. That's the difference between texture and density. The average hair density is about 2,200 hairs per 1 square inch. The average head of hair contains around 100,000 hair strands.

Below are the average number of hairs on a human head going by natural hair color.
  1. Red- 80,000... lowest density
  2. Black- 108,000
  3. Brown- 110,000
  4. Blonde- 140,000... highest density
Elasticity
...
The ability of the hair to stretch and return to its original length without breaking. This indicates how strong your hair is. This can also lead to shrinkage with curly or kinky hair textures. Wet hair stretches up to 50% of its original length without breaking. Dry hair stretches to about 20% of its original length.

  • Low Elasticity- Brittle and breaks easily. May not be able to hold a curl. This can be caused by over processing. When doing chemical services use a milder solution with a lower pH to reduce damage and prevent overprocessing.
http://linlori.files.wordpress.com/2011/01/2215386036_364fba4acd_b.jpeg

What is Porosity?
Porosity refers to the hairs ability to absorb water.
  • Hydrophobic- Healthy hair with a compact cuticle layer. This type of hair is naturally resistant to being penetrated by water and moisture. (Your hair products)
  • Hydrophilic- This is porous hair that has a raised cuticle layer allowing it to absorb moisture easier.

Levels Of Porosity
...
  • Low Porosity- Has a tight cuticle making it harder for moisture and chemicals to penetrate like hair products and color. Use more alkaline chemicals on this hair. Coarse hair naturally is low in porosity and resistant. Color processing times will be longer on this type of hair.
http://urbanbushbabes.com/wp-content/uploads/2011/04/Porosity-low2.jpg
  • Average Porosity- Normal porous hair. The cuticle is slightly raised. Chemicals and hair color take to this hair faster than low porosity hair and can result in a cooler tone.
  • High Porosity- Overly porous hair its usually damaged and the cuticle is lifted. It feels dry, fragile, and brittle. It rejects warmth when color is applied so it takes to color quickly resulting in a deeper and darker pigment. A raised cuticle never lays back down to seal in the color so it can bleed or fade rapidly after each shampoo.
http://urbanbushbabes.com/wp-content/uploads/2011/04/Porosity-high.jpg

What causes overly porous hair?
  1. Permed Hair
  2. Color Treated Hair
  3. Bleached Or Lightened Hair
  4. Chemically Relaxed Hair
  5. Chemically Straightened Hair (keratin treatments, Japanese or Brazilian blow outs)
Porosity Test
...
  1. Take several strands of hair from the hairline, temple, crown, and nape area to test. You can use this method to check for you're hairs elasticity and texture as well.
  2. Do not remove the hairs but instead hold the end of the group of hairs in your left hand at the ends.
  3. Run your thumb and forefinger from ends to scalp. Observe your hair wet and dry.
  • Feels Smooth & cuticle is compact dense and hard = resistant or low porosity
  • Feel a slight roughness = porous
  • Feels very rough, dry, or breaks = highly porous or overprocessed.
Or...
  1. Fill a glass at least 6 inches or more with water 3/4(almost) full.
  2. Let the water sit until it gets to room temperature.
  3. Remove 1-3 hairs from a hidden spot on your head.
  4. Lay one hair on top of the water being careful not to bump or move the glass.
  5. Watch to see how the hair sinks from every angle.
  • If your hair is overly porous it will sink quickly.
  • The lower the porosity the slower it will sink
  • This test is not as accurate as the other.
pH Level System
...
The pH scale has a range from 0-14
  • A pH of 7 is neutral (water)
  • A pH below 7 is acidic (closes the cuticle)
  • A pH above 7 is alkaline (opens the cuticle)
  • The natural pH of hair is between 4.5 and 5.5.

When you use any chemical texture service it raises your hairs pH from neutral to an alkaline state to soften and swell the hair. It swells in order to open the cuticle layer and allow the chemicals to penetrate the cortex layer. This is how chemical texturizers like perms and relaxers change the natural hair texture.
  • Overly porous resistant hair needs a less alkaline chemical solution with a lower pH to prevent additional overprocessing and damage. 
  • Low porosity hair needs more of an Alkaline solution to raise the cuticle layer and allow even saturation and processing.
My Hair Is Dry!
...
Dry hair can look lifeless and dull with its lack of oil. It can lead to dandruff which can cause an itchy scalp and discomfort. This can be caused by the sebaceous glands in your skin not producing enough oil.

Causes Of Dry Hair:
  1. Overuse of heat tools
  2. Chemical relaxers
  3. Chemical perms
  4. Shampooing to often
  5. Using shampoo with sulfates
  6. Swimming in chlorine (pool, hot tub)
  7. Climate (exposure to the sun)
  8. High mineral content in local water
  9. Some medications
  10. Long term illness
  11. Nutritional deficiency
10 Tips For Dry Hair:
  1.  If you wash your hair with shampoo daily you may be doing more harm than good. On average try to wash your hair a minimum of 3 times a week and no more than 5 times a week.
  2.  Stop using shampoo containing sulfates because they are detergents that are in 80% of commercial shampoos. Detergents dry out your scalp even more by stripping the natural oils your body secretes from your scalp. More acidic shampoos are better for the hair with a pH between 4.5 and 6.7.
  3. Don't Scrub your head with your fingernails because it can create tiny surface abrasions on the scalp. If you experience burning during chemical services this may be why. You can also break off hair and irritate your dandruff. Use your finger tips instead to help blood circulation and stimulate the oil glands.
    • After rinsing your conditioner out rinse the hair with cool not cold water to seal the outer layer of your hair back down. This will help keep the moisture in your hair and add shine.
  4. Watch out for alcohol because this product is very drying to anyone's hair especially those who have dry hair already. Hair products like mousse commonly contain this ingredient.
  5. Read the ingredient list on everything before buying any product. If it contains alcohol or sulfates put it down. Even if  a product says "sulfate free" on the front that may not be entirely true.
  6. Check your kitchen because its full of great things to help with shine and breakage. 
    1. Eggs
    2. Yogurt
    3. Mayonnaise
    4. Milk
    5. Lemon
    6. Avocado
    7. Banana
    8. Honey
    9. Beer
    10. Extra virgin olive oil
    11. Vinegar
    12. Apple cider vinegar
    • Vinegar is an awesome conditioner that is great for cleanliness and adding shine. It can also help improve dandruff. All you need a a tablespoon in your hair as you rinse it. You can keep this in a travel sized bottle to keep in the shower. Massage it into your hair before you use a sulfate free shampoo to remove product buildup and dirt. It wont strip all of the oil out of your hair but will help give your hair an extra cleansing.
  7. Add moisture to your hair with deep conditioning treatments. Overnight conditioners work well where you sleep in a shower cap. If this isn't an option for you try sitting under a dryer with conditioner in your hair for 30-45 minutes to assure the moisture penetrates your hair. You can get single use deep conditioning packets for around a dollar at Sally Beauty Supply. Companies like Miss Jessie's give away free samples a couple of times a year. You can also apply conditioner to your dry scalp to help.
  8.  Try a hot oil treatment which can be homemade or store bought. They add moisture, relieve itching, and add shine to your hair. Your hair will feel softer and more manageable.
  9. Don't brush wet hair but instead use a wide tooth comb to reduce hair breakage. Brush your hair lightly when dry if needed. Try a boar bristle or vent brush because both are easier on hair strands. Boar bristle brushes also promote shine to help the dull look of dry hair.
  10. Avoid heat because it will dry your scalp and hair out more and cause breakage to fragile dry hair. Try the cold or low setting when drying your hair.
My Hair Is Oily!
...
Oily hair looks and feels like it has a greasy buildup on the scalp and an oily coating on the hair. Your sebaceous glands could be overly producing oil (sebum) or you could be overly shampooing your hair. Greasy or oily hair can cause acne and potential hair loss.

Causes Of Oily Hair:
  1. Overactive Sebaceous/oil glands (over stimulation)
  2. Over use of shampoo (cleansing daily)
  3. Higher hair density (more hair = more sebaceous glands)
  4. Puberty (hormones)
  5. Genetics
  6. Improper use of hair products (to much hair product)
  7. Lack of hair cleansing (poor personal hygiene)
  8. Unhealthy diet (eating greasy junk food)
10 Tips For Oily Hair:
  1. Look for hair cleansers that moisturize and say "clarify" or "oil-reducing" on them.
  2. Try shampooing less to reduce the overactive oil glands or shampooing more if your oil build up is caused by not cleansing enough. Once you strip the oil from your hair with shampoo containing sulfates your body works double time to replace what oil it had lost. This causes your scalp to produce more oil over time versus reducing the oil.
  3. Only apply shampoo for oil on oily parts of the hair. Because oil reducing shampoos can be harsh on the hair try to avoid getting it on the parts of your hair that aren't oily. You can strip the hair of natural oils this way. 
  4. Do not apply conditioner to your scalp but instead apply it mid shaft and down to your ends.
  5. Always rinse the hair with hot water to ensure the cuticle opens and releases the oil from your hair.
  6. Try hair products that contain alcohol to attract oil like mousse, gel, or pomades reducing buildup.
  7. Avoid touching or combing your hair as often as possible. The more you touch your hair the more you stimulate your oil glands. You can also transfer oil to and from your scalp causing a buildup quickly.
  8. Avoid bangs that sit on your forehead because you can transfer oil to and from your hair to your skin. This can cause severe acne and excess oil in the front of your hair.
  9. Try not to use oil based makeup and skin care products.
  10. Find a go to up-do for when your hair becomes greasy throughout the day while you regulate your shampooing. Getting your hair off of your face will spare you acne and excess oil transfer to your hair from your face.
Everyone's hair is different and everyone has daily struggles with their hair. I hope this post will help you bond with your hair more and to understand  why your hair does the annoying things it does! Take a deep breath and try to go through life one good hair day at a time!

~"Some of the worst mistakes in my life were haircuts" - Jim Morrison~

Wednesday, January 9

How To Pre-Poo

A "pre-poo" is a  pre shampoo treatment that you leave on your hair for an extended amount of time before you want to shampoo your hair. Its purpose is to protect your hair from the harshness of the shampoo process and protect your hair from drying out or being stripped of essential oils. It achieves this by creating a barrier around your hair or a coating the sulfates in the shampoo can't penetrate. It adds softness, shine, and moisture to your hair leaving your natural oils alone for the most part. It can consist of conditioner, oils, or edible items. I've heard of bananas, avocado, honey, yogurt, eggs, and mayonnaise being used in the hair. You can combine these or apply them by using any method. I use the LOC method which you can learn more about in my last Transitioning Hair Regimen post.

http://hairdr13.blogspot.com | KitchenKurls | How To Pre-Poo

Pre-Poo How-To:
    http://hairdr13.blogspot.com | KitchenKurls | How To Pre-Poo
  1. I start by wetting my hair with a mixture of bottled water and olive oil.
  2. I apply my oil solution focusing on my ends that consist of Olive Oil, Coconut Oil, and Tea Tree oil. The oil traps the moisture from the liquid component in my hair preserving moisture for a longer period of time. It also helps with an itchy scalp, gives my hair shine, and helps my split ends. I purchased both plastic bottles for my liquid and oil at Sally Beauty Supply
  3. Then for my cream component I use conditioner. Get a cheapo conditioner because you'll be using a ton of it! I use Simply U Moisturizing Conditioner which I bought at Wal-mart because it contained none of the icky chemicals hair hates, it was cheap, and it had a great pump on it. 
  4. Start at your ends and work your way towards your roots. This locks in moisture and creates a barrier around the hair protecting it from the shampoo.
  5. The final step is to finger comb and then detangle the hair using a denman brush, wide tooth comb, or a Tangle Teezer. I don't put any product in my hair for this step but I would recommend Kinky Curly Knot Today as a GREAT detangler. By finger combing first you get rid of the knots in your hair gently causing less breakage.

http://hairdr13.blogspot.com | KitchenKurls | How To Pre-Poo
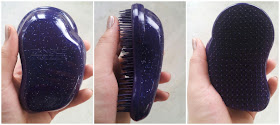
My Disco Purple Tangle Teezer
Ideally you should pre-poo before every shampoo containing sulfates allowing it to sit on your hair for 30-60 minutes. The time length is needed in order for your hair to have time to absorb and lock in the treatment. You can put a shower cap and a towel/turban over your hair or sit under a heated hood dryer if you prefer. 

Hot Oil Rinse
...

If you want to skip the heated dryer another way to prepare your hair for a shampoo is to apply your oil solution warmed up onto your hair. This can be called a hot oil pre- poo or a hot oil rinse which will leave your hair softer, shinier, and more manageable after 30-60 minutes. Check out YouTube for great recipes or visit your local beauty supply store because places like Sally Beauty Supply sell oils in one time use microwaveable containers as shown below. 

KitchenKurls| How To Pre- Poo | http://hairdr13.blogspot.com


Who Should Use Hot Oil Rinses?
  1. Chemically textured hair like permed and relaxed hair can become damaged.
  2. Chemically bleached or lightened hair. The bleach is very drying and damaging to the hair.
  3. Color treated hair can become dry and dull looking.
  4. Dry hair which can be caused by genetics or even the climate can leave the hair dull and lifeless while being more prone to breakage.
  5. Heat tools like flat irons, blow dryers, and curling irons can break and damage the hair.

Pros:
  • Softer Hair
  • More Manageable Hair
  • Shinier Hair
  • Helps Split Ends
  • Smooths Cuticle
  • Budget Friendly
  • Easy To Make
  • Helps A Dry Scalp
  • Prevents/Reduces Dandruff
  • Adds Body
  • Prevents Frizz
  • Prevents breakage
  • Prevents Dry Hair Shaft
  • Moisturizes Scalp
Oil:
  1. Coconut Oil- This is my favorite oil and can help a dry scalp.
    • Conditions the scalp.
    • Stimulates hair growth.
    • Adds softness and manageability.
    • Adds a great shine to my hair.
    • It can reduce or eliminate dandruff.
  2. Jojoba Oil
    • This is a good lightweight option for oily hair.
    • Will leave the hair soft.
    • Helps a dry scalp.
    • Prevents dandruff.
  3. Almond Oil-
    • Conditions and nourishes the scalp.
    • Great for a dry scalp
    • Packed full of moisture.
    • Stimulates hair growth.
    • Softens the hair.
    • Smooths the cuticle.
  4. Castor Oil
    • Good for oily hair because of its drying properties. 
    • It will strengthen your hair.
    • A good option for damaged hair
  5. Olive Oil
    • High in antioxidants A and E.
    • A great nourishing oil.
    • Has anti-aging properties.
    • Can be used on any hair type. 
    • It can add softness and manageability.
    • Makes the hair shiny.
    • Has disinfectant properties.
    • Heals and soothes the scalp. 
    • Great for dry itchy scalps.
    • Improves Elasticity
  6. Avocado Oil
    1. Contains vitamins A, D, & E.
    2. Great for dry or frizzy hair.
    3. Has tons of protein.
    4. Contains follic acid, magnesium, copper, iron, and amino acids.
    5. Promotes hair growth.
    6. Nourishing and moisturizing.
    7. Easily penetrates the hair and skin.
    8. Great for all hair types.
Optional Ingredients:
  1. Essential Oils- Adds a great smell and can be relaxing.
  2. Finely Ground Coffee/Chamomile
  3. Honey- Honey is a humectant meaning it attracts and retains moisture in the hair.
  4. Conditioner- Use a moisturizing conditioner.
  5. Bananas- A banana will help the hairs elasticity.
  6. Aloe Vera Gel- Stimulates hair growth and helps breakage.
  7. Herbs- Can add a lot to your hair depending on the herb.
  8. Egg Yolks- Just use the white if you have oily hair but eggs have tons of protein and nourishing qualities to help the softness and shine of the hair.
  9. Avocados- These are packed full of protein and add shine to the hair. Great for dry, breakage prone hair
  10. Lemon, Lime, & Grapefruit Juice- Lemon juice adds a great smell and can be used for someone with highlights. The grapefruit juice will clarify your hair.
My Homemade Recipe:


  • 3 Tbs. Olive Oil
  • 2 Tbs. Coconut Oil
  • 1 Tbs. Honey
  • 1/4 Cup. Conditioner 
  • 1 tsp. Lemon juice

Supplies:

  1. Shower Cap
  2. Wide Tooth Comb
  3. 4-6 Clips
  4. Sulfate Free/Gentle Shampoo
  5. Cleansing/Moisturizing Conditioner
  6. Ingredients Of Choice- There's no limit to how many ingredients you can mix and use.


Stove Top:

  1. Place your oil in a plastic bottle that is heat safe or a glass container.
  2. Bring 2 cups of water to a boil.
  3. Turn the heat off and place your container in the water for 1-2 minutes
  4. Let cool slightly and then test mixture on the back of your wrist before application.

Microwave:

  1. Place oil into a microwave safe bowl.
  2. Heat for up to 20 seconds.
  3. Do not let the oil pop or boil.
  4. Remove the bowl ad let the oil cool slightly.
  5. Test the oil on the back of your wrist before application.
Hot Oil Rinse How To:
  1. I start with clean, damp hair. You can just dampen the hair with warm water in a spray bottle instead of shampooing. You can apply the treatment to dry hair as well in the winter months if you prefer.
  2. Part your hair into 4-6 sections depending on its thickness.
  3. You can apply your ingredients by:
    • A color (tint) brush and bowl.
    • Pouring it onto your hair over the sink.
    • Applicator bottle directly to the scalp in 1/4 inch partings.
  4. Massage the oil into your scalp and finger comb.
  5. Pin up the saturated hair.
  6. Throw a towel into the dryer for 5 minutes on high heat or dampen a towel with warm water and ring out the excess.
  7. Place a plastic cap over your head and put the towel around the cap. Drape a towel over your shoulder in case of leaks also.
  8. Sit for 30 minutes to an hour with the solution on your hair to assure it is absorbed.
  9. Rinse the solution out with warm not hot water and then cool water to seal your cuticle back down to create a barrier the shampoo can't get past.
  10. Shampoo and condition as normal and your done.
Tips:
  1. The hair does NOT need to be soaked with oil or it will just run down your face and back.
  2. You can use a hot oil rinse up to once a week.
  3. Play around with ingredients and keep trying new things.
  4. The hair should not be soaking wet with water before applying the treatment because the hair will be filled with water and not have any room left for the oil to be absorbed. The oil could slip right out of the hair and be a waste.
  5. Don't burn yourself applying HOT oil to your hair. It only needs to be WARM.
  6. If you don't want to use a warm/damp towel you can sit under a hood dryer or a soft hood dryer. A heat free option is to use your bodies natural heat by placing a turban on your head or a plain towel to hold the heat in.
  7. Leave the treatment in for as long as possible because the heat opens your hairs outer-most layer called the cuticle. The cuticle raises up allowing the oil to be absorbed deeper into the center of your hair strand. If you wait long enough your cuticle will lay back down sealing in the oils which is why the full 30-60 minutes is needed.


"The beauty of a woman is not in the clothes she wears, the figure that she carries or the way she combs her hair." - Audrey Hepburn 

~Good luck with your natural hair journey.~


Check Out These Other Great Blogs...

Friday, January 4

Transitioning Hair Regimen


I get lost in a sea of hair products every morning in the bathroom while I'm trying to get ready. I needed a hair regimen while I transition from relaxed to natural hair. I didn't want it to be a long process that used 5 different hair products so I simplified it to make it as easy and quick as possible.
  1. Start off with dry hair and clip it out of the way into 4-6 sections.
  2. If I'm going to shampoo my hair I prepare it by applying my pre-poo using the LOC method. Find out more about how to pre- poo >>HERE<<
  3. I get into the shower with my hair still in the clips. Use warmer water to open up your hair cuticle.
  4. I completely saturate my hair while it remains in the clips.
    • If I am going to shampoo my hair I use a sulfate free(lather free) shampoo.
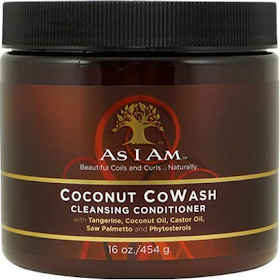
  5. I condition my hair with my favorite As I Am Coconut Cowash and leave it in while I shave or wash my face.
    • Before clipping the section back up I finger comb to remove any tangles and distribute the product.
    • You can use any conditioner or co-wash for this step that does not contain surfactants.
  6. To condition I'll normally leave it on for 3 minutes. To deep condition I'll leave it on up to 10 minutes.
  7. I remove the clips and turn the heat down until the water is lukewarm to cool and rinse out the conditioner 
    • Finger comb your hair back and down during this step under the running water to easily detangle.
    • The cool water makes sure the product leaves your hair but none of the moisture does by sealing your hairs cuticle down. Learn more about your hair HERE.
Http://hairdr13.blogspot.com | KitchenKurls | Transitionign Hair Regimen
As I Am Products are amazing!
  • If I really want to repair my hair I'll leave the conditioner in and wrap it up into a shower cap while I get things done around the house. I just rinse my hair under cool water in the kitchen sink after 30 minutes.
  • Its okay to leave conditioner in your hair when you get out of the shower and never rinse it out as long as you don't get heavy handed with it.
  • When I get out of the shower I wrap my hair in a microfiber towel or cotton t-shirt to reduce the frizz .
  • I usually let it air dry half way before applying any products.When you get out of the shower your hair strands are filled with water so I don't want to apply my products right away because theres no room left. By letting it air dry I'm assured my hair absorbs the product I put into it instead of it just sliding off.
  • I use the LOC method and detangle with my tangle teezer. See below for more info on the LOC method.
  • Its always good to lay your edges down with gel ahead of time so that they can fully dry. Wrap your hair with a silk or satin scarf as tightly as you can handle. Keep it on for at least 20 minutes while you put your makeup on.
  • I try to avoid mousse and hairspray because they make my hair dry feeling/looking. It doesn't seem to do much, I run out quickly, and it can add a nasty crunchiness. These products contain alcohol which is a no no for naturally curly hair. No one wants dried out crunchy curls!
Http://hairdr13.blogspot.com | KitchenKurls | Transitioning Hair Regimen
Disco Purple Tangle Teezer

http://hairdr13.blogspot.com | KitchenKurls | Transitioning Hair Regimen
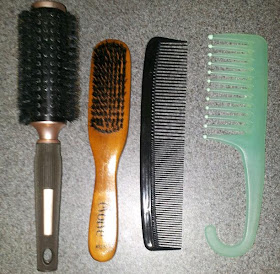
From Left: Boar bristle round brush, styling boar bristle brush, comb, shower comb
 
http://hairdr13.blogspot.com | KitchenKurls | Transitioning Hair Regimen

Once I am 100% natural I vow to...
  • Assure the products I'm using don't contain alcohol, surfactants, sulfates, metallic dyes, or silicone's. 
  • Not apply heat to my hair by blow drying and flat ironing until fall. 
  • Use a heat protectant any time I come into contact with heat.
  • Use the chase method using a boar bristle brush when flat ironing my hair
  • Only shampoo once every two weeks
  • Co-wash every 3 days.
  • Not use a comb in my hair while it is dry or a brush in it while it is wet.
  • Air dry more often instead of using a diffuser. 
  • Always finger comb first.
  • Baby my hair with moisture and essential oils.
  • Try new products.
  • Wear my satin bonnet every night.
  • Experiment with protective hairstyles.
  • Get into the habit of a bedtime routine.
  • Get trims every 3 months.
  • Abstain from coloring or bleaching my hair.
  • Embrace my natural curl pattern.
~"We don't go "natural", we return. "Natural", is where it began."~

Check Out Other Great Blogs...